
Milking Techniques
Milking a goat with only two teats instead of four (when comparing to a cow) may make it seem easy - but it can actually be quite a finicky process and a good milker will have careful attention to detail.
Hygiene
Before a goat is ready for cupping, her udder must be checked to ensure it is clean and dry and has no physical defects such as open wounds or hard and inflamed tissue (which could indicate mastitis).
Goats with damaged teats/open wounds should not be milked into the vat as this is a potential source of bacteria. These goats should be milked in a separate mob and excluded from the vat, or in minor cases, a test bucket and may be used to isolate their milk. If the wound requires treatment (injectable or topical), ensure any withholding periods are observed.
Any goat with a hard and/or red and swollen udder, a sudden drop in udder tightness, or any other observed change in their udder conformation, should have their milk checked prior to being milked. Initially this can be done by 'strip checking' - i.e. stripping some of the milk out and looking for visible indicators of poor milk quality. Using a black paddle or dark surface to strip onto makes it easier to identify such markers, such as thin/watery milk, thick cream-coloured milk, or milk with visible clumps or chunks. An RMT (Rapid Mastitis Test) may also be performed. If there is any indication that the milk quality is compromised, the affected halves should be appropriately marked as not suitable for milking into the vat (see below for advice on Marking Systems).
Mostly, the goats will present to the shed with clean udders. However, 'wet' feeds such as lush grass or chicory, climatic factors and any issues affecting good bedding management can lead to dirty udders. Other factors, such as a goat slipping over on the yard or having digestive issues, can also cause a goat to present with a dirty udder. There are multiple options for dealing with dirty udders, the first of which should be preventing them in the first instance. beyond that, udders can be cleaned with paper towels or damp cloths. On our farm we have a set of microfibre cloths dedicated for use as udder wiping cloths that are thoroughly cleaned and reused as necessary. Always remember that antibacterial teat wipes must NOT be used before cupping a milking animal.
It is common for goats to remove one or both cups using their foot. This usually leads to muck sitting near the top of the cup (or in some cases down the inside of the liner), either from to hoof or from falling onto the bale surface, which must be removed before recupping. It can also leave muck on the goat's udder which, if the goat in question isn't fully milked out yet and needs to be recupped, needs to be wiped away. Most of the time this excess muck can be wiped away with your finger but in extreme cases will need either a clean cloth and/or water to tidy it up. Milkers should be encouraged to routinely keep an eye on the inside of the liners each and every time they cup a goat. This should become a subconscious action that automatically happens and that they react to when muck is noticed.
In addition to keeping the cups clean, the milker must keep their hands clean. The use of milking gloves is a useful aid, but even with gloves, these need to be kept free of wet muck throughout the milking. Attention also needs to be paid to people coming and going from the milking shed, for example if a staff member moves from feeding or handling kids to helping to finish off the milking, or is handling silage or greasy machinery and then coming into the milking area to give a hand.
Cupping Technique
Previous experience of milking other dairy animals, such as cows, can be an advantage, but often it is easier to learn good goat cupping techniques from scratch rather than learning to adjust your previously learnt technique. In essence, the function is the same, however the actual technique needs to be altered in order to ensure the goat teats are properly aligned in the cups.
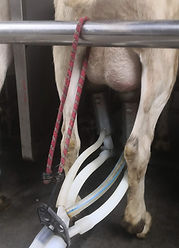
With only two cups, and typically no cluster bowl, holding and placing the cups initially feels different for anyone used to cupping cows. The good news it, they are also much lighter. Some of the cupping technique used will be determined by the size and shape of the goats udder and teat placement, which is much is less uniform than a cows. Where a goat has good udder attachment and height, along with tidy teat shape and placement, you can hold one cup in each hand and cup both teats at the same time. More often than not, however, one hand will be needed to lift or move the udder slightly in order to cup one teat and then the other. Holding the cups near the top and using your pointer finger to guide the teat into the cup improves placement and alignment. An experienced milker will usually be able to 'feel' when the teat has sucked into position nicely and a good vacuum seal has been achieved. When it 'feels wrong' the pointer finger can be used to press gently on the back of the teat, allowing the cup suction to draw the teat down into the cup properly.
The majority of goat milking cups are clear plastic with silicone liners which aids in the early detection of misaligned teats. Despite this, milkers should routinely visually check the previously cupped 2-3 goats as they complete cupping the goat in front of them, and adjust any as required. In a herringbone shed, milkers should ideally be 'trained' to check for misaligned teats anytime they are walking the row, particularly when they are returning to the top of the pit to start the next row. The quicker a misaligned teat can be identified and corrected, the less time is potentially wasted waiting for them to finish milking out and of course reduces teat damage and discomfort for the goat.

Holding the cups at the top allows you to easily use your pointer finger to guide the teat into the cup as needed.
Cup Removal
In order to remove the cups without teat damage, the vacuum to the cup must be stopped. Some shed systems will use clips but the most common method is folding the milk tube and holding it tight until the suction is broken. Hold your hand under the cups and they should literally fall off into your hands. Giving the cups a slight twist and pull will assist in removing the cups quickly. If any resistance is felt during this process, do not just pull harder or you will cause teat damage and discomfort to the goat. Instead, use your finger to push in on the back of the teat, or twist the cup gently, to break the suction. If the shed is fitted with automatic cup removers, the vacuum will drop automatically, allowing the cups to fall off and be lifted up and out of the way via a retracting cord.
Cup Slipping
Dairy goat sheds typically operate at a lower vacuum ratio compared with dairy cow sheds (in order to reduce milk quality losses associated with air damage). This, coupled with the fact goats can be a bit more fidgety when being milked, can lead to increased cup slip during milking. Cup slipping is not only uncomfortable for the goat, meaning she is likely to kick them off, but also causes teat damage which can lead to mastitis.
Marking Systems
A clear marking system ensures that any changes to which goats should or shouldn't be milked on any given day is communicated and understood, regardless of which staff members are rostered on. The system should cover any goats who:
-
should not be milked at all
-
should be milked into a test bucket or in a separate mob
-
need to be strip checked before milking
It may also cover other factors such as goats who should be monitored based on BCS, general health, or need their feet and/or horns trimmed.
Understanding the marking system should be part of your induction programme for any new staff and regularly reviewed with long term staff members. A poster or other visual aid should be placed in a prominent position for easy reference during milking.
A copy of our Goat Marking System can be downloaded by clicking the download button below. You are welcome to adopt this same system and use the poster with your own staff or amend it to suit your own system. Often we will only place a blue dot on 'watch goat' and turn it into a sad face if it continues to require watching after a day or two. Once a goat no longer needs the marking, the marking is painted over with green. ALL goats treated with any medication on our farm are marked with RED paint, and red paint is ONLY used for indicating an animal has been treated. Any animals treated with a medication that has a nil milk withholding are still marked RED but with green lines over the top straight away.
You may also like to use these posters in conjunction with our Goat Treatment Guidelines sheet.
FREE: Download a SAMPLE Goat Marking System poster (in pdf format) - this version includes the marking system we currently use, so is 'ready to go' if you would like to use the same marking system as we do
FREE: Download a BLANK Goat Marking System poster (in pdf format) - this version has the images and reasons you might mark a particular goat, but the actual marking system is blank so that you can create your own personalised version by printing and drawing in your own marking system before laminating it for durability.


Use your finger at the top of the teat to press in slightly. This allows the teat to be sucked into place for correct milking alignment
In a herringbone shed, you will then rotate yourself to the other row and cup the goat opposite the one you have just removed the cups from. Each farm will have its own system but when all the milkers turn in the same direction when cupping, it is not only more time efficient but also prevents the hoses from becoming twisted. Twisted hoses will skew the cups and cause the goat to either milk out unevenly or slip and/or fall off before she is milked out fully.
To avoid teat damage and discomfort, ensure the milk tube is firmly folded over to break the suction before removing the cups.
With young goats, teat slipping may be difficult to avoid. An elastisized bungy cord to hold the cups up can be a useful aid.